![[Spring] AOP(joinpoin, pointcut, advice, aspect, weaving)](https://img1.daumcdn.net/thumb/R750x0/?scode=mtistory2&fname=https%3A%2F%2Fblog.kakaocdn.net%2Fdn%2FBYAF5%2FbtrnfAfgqzI%2FkCQm3Iqu7A20ElnHQrjfs0%2Fimg.png)
AOP(Asperct Oriented Programming) : 관점 지향 프로그래밍
cc(core concern) -> 주 관심사항
ccc(cross cutting concern) -> 공통 관심사항
joinpoint : ccc가 결합될 수 있는 모든 상황(메소드 호출 등)
-인스턴스의 생성시점으로 메소드를 호출하는 시점이다. Exception이 발생하는 시점과 같이 애플리케이션이 실행될 때 특정 작업이 실행되는 시점을 의미한다.(Aspect를 플러그인 할 수 있는 애플리케이션의 실행 시점)
pointcut : ccc가 결합될 특정 joinpoint를 선언
-충고가 어떤 결합점에 적용되어야 하는지 정의한다. 명시적인 클래스의 이름, 메소드의 이름이나 클래스나 메소드의 이름과 패턴이 일치하는 결합점을 지정 가능토록 해준다.(스프링 설정파일 안에 XML로 작성)
advice : ccc 실제 구현 코드(target 전, 후에 공통 관심사 ccc 붙여줌)
-교차점에서 지정한 결합점에서 실행(삽입)되어야 하는 코드로 Aspect의 실제 구현체이다.
advisor(aspect) : pointcut+advice
-AOP의 중심단위로 Advice와 pointcut을 합친 것으로 구현하고자 하는 횡단 관심사의 기능, 애플리케이션의 모듈화 하고자 하는 부분이다.
wevning : 프로그램이 묶여서 잘 실행되게 하는 것
-에스펙트를 대상 객체에 적용하여 새로운 프록시 객체를 생성하는 과정을 말한다.
Aspect는 대상 객체의 지정된 결합점에 엮인다.
proxy:타겟인척 하는 애, 신호를 대신받아줌, 프록시가 인터셉트 해서 강탈해와서 응답해준다.
각 코드의 진행순서중 객체를 생성하는 단계나 메서드를 호출하는 단계가 있는데 이를 joinpoint라고 합니다.
메서드를 호출할 경우에는 메소드를 호출해서 실행 후 리턴되어 다시 돌아와야합니다.
호출 했는데 누군가가 '내가 호출한 메서드야' 하고 대신 메서드 호출 신호를 강탈(intercept)하게 되는데 이를 proxy객체라고 합니다.
이런 proxy 객체가 앞뒤에 붙여야 할 값을 모두 붙여준뒤 다시 응답해줍니다.
이때 앞에 붙는 값을 before, 뒤에 붙는 값을 after라고 하며 원래 메서드가 실행될때 붙어야 하는 값을 target이라고 합니다.
즉, proxy는 target인척 한다고 할 수 있습니다.
메서드 호출이 이렇게 응답을 받게 되면 응답받은 것이 Student m의 것이라고 인지하게 됩니다.
proxy객체가 언제 어떤 joinpoint에서 신호를 강탈 할 것인지 알려주는 것을 pointcut이라고 합니다.
또한, before나 after와 같은 ccc(공통 관심사항)를 붙이는 실제 코드를 advice라고 합니다.
이러한 pointcut과 advice를 합해서 advisor또는 aspect라고 합니다.
또한 분리되어 있는 이러한 과정을 하나로 뭉쳐야 제대로 실행이 되는데 이를 묶는 것을 weaving이라고 합니다.
코드를 통해 AOP를 설명해보고자 합니다.
우선 프로젝트를 만들때 maven으로 만들어주시고 pom.xml에
dependency에
spring-core
spring-context
org.aspectij.aspectjweaver
org,aspectj.aspectjrt
를 추가해주세요!
pom.xml
<project xmlns="http://maven.apache.org/POM/4.0.0"
	xmlns:xsi="http://www.w3.org/2001/XMLSchema-instance"
	xsi:schemaLocation="http://maven.apache.org/POM/4.0.0 http://maven.apache.org/xsd/maven-4.0.0.xsd">
	<modelVersion>4.0.0</modelVersion>
	<groupId>Spring06_AOP</groupId>
	<artifactId>Spring06_AOP</artifactId>
	<version>0.0.1-SNAPSHOT</version>
	<build>
		<sourceDirectory>src</sourceDirectory>
		<plugins>
			<plugin>
				<artifactId>maven-compiler-plugin</artifactId>
				<version>3.8.1</version>
				<configuration>
					<release>11</release>
				</configuration>
			</plugin>
		</plugins>
	</build>
	<dependencies>

		<!-- 추가 -->
		<!-- spring core -->
		<dependency>
			<groupId>org.springframework</groupId>
			<artifactId>spring-core</artifactId>
			<version>5.3.6</version>
		</dependency>
		<!-- spring context -->
		<dependency>
			<groupId>org.springframework</groupId>
			<artifactId>spring-context</artifactId>
			<version>5.3.6</version>
		</dependency>
		<!-- spring aop -->
		<dependency>
			<groupId>org.springframework</groupId>
			<artifactId>spring-aop</artifactId>
			<version>5.3.6</version>
		</dependency>

		<!-- aspectjweaver -->
		<dependency>
			<groupId>org.aspectj</groupId>
			<artifactId>aspectjweaver</artifactId>
			<version>1.9.6</version>
		</dependency>
		<!-- aspectjrt -->
		<dependency>
			<groupId>org.aspectj</groupId>
			<artifactId>aspectjrt</artifactId>
			<version>1.9.6</version>
		</dependency>

	</dependencies>
</project>
이제 aop를 만들어 보겠습니다.
Student인터페이스를 만들고 이를 상속받는 주 관심사항 Man과 Woman클래스를 만들고 공통 관심사항인 MyAspect클래스를 만들어주세요!
MyAspect클래스는 MethodInterceptor를 상속 받습니다!
패키지 구조

Student.java
package com.test02;

public interface Student {

	void classWork();

}
Man.java
package com.test02;

public class Man implements Student {

	@Override
	public void classWork() {
		System.out.println("컴퓨터를 켜서 뉴스본다");
	}

}
Woman.java
package com.test02;

public class Woman implements Student {

	@Override
	public void classWork() {
		System.out.println("컴퓨터를 켜서 주식본다");
	}

}
MyAspect.java
package com.test02;

import org.aopalliance.intercept.MethodInterceptor;
import org.aopalliance.intercept.MethodInvocation;

public class MyAspect implements MethodInterceptor{

	@Override
	public Object invoke(MethodInvocation invocation) throws Throwable {
		Object target = null;

		System.out.println("출석한다.");

		try {
			target = invocation.proceed();
		} catch (Exception e) {
			System.out.println("쉬는날이었다.");
		} finally {
			System.out.println("집에 간다.");
		}
		return target;
	}

}
applicationContext.xml
<?xml version="1.0" encoding="UTF-8"?>
<beans xmlns="http://www.springframework.org/schema/beans"
	xmlns:xsi="http://www.w3.org/2001/XMLSchema-instance"
	xsi:schemaLocation="http://www.springframework.org/schema/beans http://www.springframework.org/schema/beans/spring-beans.xsd">

	<bean id="man" class="com.test02.Man" />
	<bean id="woman" class="com.test02.Woman" />

	<!-- ccc : 공통 관심사항 -->
	<bean id="myAdvice" class="com.test02.MyAspect" />

	<!-- proxy -->
	<bean class="org.springframework.aop.framework.autoproxy.DefaultAdvisorAutoProxyCreator" />

	<!-- advisor = advice + pointcut -->
	<bean id="myAdvisor" class="org.springframework.aop.aspectj.AspectJExpressionPointcutAdvisor">
		<property name="advice" ref="myAdvice" />
		<property name="expression" value="execution(public * *(..))" />
	</bean>
</beans>
MTest.java
package com.test02;
import org.springframework.context.ApplicationContext;
import org.springframework.context.support.ClassPathXmlApplicationContext;
public class MTest {
public static void main(String[] args) {
ApplicationContext factory = new ClassPathXmlApplicationContext("com/test02/applicationContext.xml");
Student m = factory.getBean("man", Student.class);
Student w = (Student) factory.getBean("woman");
System.out.println("남학생 입장");
m.classWork();
System.out.println("----------");
System.out.println("여학생 입장");
w.classWork();
}
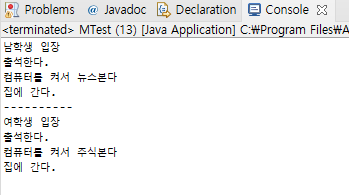
}실행결과
applicationContext.xml에서
<bean id="man" class="com.test02.Man" />
<bean id="woman" class="com.test02.Woman" />
man과 woman의 객체가 만들어져 있습니다.
<bean id="myAdvice" class="com.test02.MyAspect" />또한 공통관심사항(ccc)에 속하는 myAdvice객체도 만들었습니다.
<bean class="org.springframework.aop.framework.autoproxy.DefaultAdvisorAutoProxyCreator" />이 객체는 proxy에 해당합니다.
<bean id="myAdvisor" class="org.springframework.aop.aspectj.AspectJExpressionPointcutAdvisor">
	<property name="advice" ref="myAdvice" />
	<property name="expression" value="execution(public * *(..))" />
</bean>
또한 MTest의 main메서드에서 보면
ApplicationContext factory = new ClassPathXmlApplicationContext("com/test02/applicationContext.xml");

Student m = factory.getBean("man", Student.class);  //jointpoint
Student w = (Student) factory.getBean("woman");  //jointpoint

System.out.println("남학생 입장");
m.classWork();  //jointpoint
System.out.println("----------");
System.out.println("여학생 입장");
w.classWork();  //jointpoint
메서드를 호출할 경우에는 m.classWork();의 경우 Student타입의 m이라는 객체로 가서 classWork라는 메소드를 호출해서 실행 후 리턴되어 다시 돌아와야하지만 중간에 MethodInterceptor를 상속받은 MyAspect에서 proxy 객체가 만들어집니다.
proxy는 내가 m이다! 하고 신호를 강탈합니다.
public Object invoke(MethodInvocation invocation) throws Throwable {
	Object target = null;

	System.out.println("출석한다.");

	try {
		target = invocation.proceed();
	} catch (Exception e) {
		System.out.println("쉬는날이었다.");
	} finally {
		System.out.println("집에 간다.");
	}
	return target;
}
이런 proxy는 before에 해당하는 "출석한다"와 after에 해당하는 "집에 간다."를 붙이고 주 관심사항인 target도 붙이게 된다.
따라서 리턴이 되면 "컴퓨터를 켜서 뉴스본다"가 실행이 되어야하는데 실제 실행결과에서는 위아래 다른 값이 붙어있습니다.
코드에서는 Man과 Woman에 있는 컴퓨터를 켜서 주식을 보는 것과 뉴스를 보는 것은 CC(core concern)이고 MyAspect에 있는 출석, 쉬는날, 집에간다 등이 CCC(cross Cutting Concern)가 되고 CC는 target이 되고 CCC는 before와 after가 됩니다.
'Java 관련 > Spring Legecy' 카테고리의 다른 글
| [Spring] AOP(before, after, after-returning, after-throwing, around) (0) | 2022.03.27 |
|---|---|
| [Spring] AOP(Aspect Oriented Programming) (0) | 2022.03.26 |
| [Spring] AOP(cc / ccc) 관점 지향 프로그래밍 (0) | 2022.03.24 |
| [Spring] Annotation(@Component) (0) | 2022.03.23 |
| [Spring] Annotation(@Autowired, @Qualifier) (0) | 2022.03.22 |